

To create a new application using Silverlight, first must start Visual Studio 2010.
Then from menu choose File / New / Project

Onto the new window choose Silverlight, .NET Framework 4, Silverlight Application. Give a name for the project such as SilverlightProduct and finally press button Ok.

A new modal window with title New Silverlight Application should be come.
In normal conditions you will not need to change nothing, but simple press the OK button

When you have done all the above, the Solution Explorer will be like the screenshot on the right

Place your mouse pointer on SilverlightProduct.Web and then click the Right mouse button.
From the new list choose Add / New Item

A new modal window with title Add New Item - SilverlightProduct.Web should be come.
In the middle of the window find the choice Class.
Replace the name of the Class with Product.cs
At the end press the OK button

Into the Product.cs file we will add code to define the product class
You can see the code on the left screen.
Don't worry about the errors on the error list window. If you type exact what you see, all the error will be removed during the next step.

Place your mouse pointer once more on SilverlightProduct.Web and then click the Right mouse button.
From the new list choose Add / New Item

In the left of the window choose Silverlight
In the middle of the window find the choice Silverlight-enabled WCF Service.
Replace the name of the Service with InventoryService.svc
At the end press the OK button

Type using System.Collections.Generic; at appropriate section (see left screenshot).
Then delete the masked code lines (see left screenshot).

In the InventoryService.svc file write the code lines you will find on the left screenshot.
When you have finished don't forget to save your work
After this step normaly the errors from the prior step should have be removed

From the main menu chooce Build and the submenu choice Build SilverlightProduct.Web.
Place your mouse pointer once more on SilverlightProduct and then click the Right mouse button.
From the new list choose Add Service Reference...


A new modal window with title Add Service Reference should be come.
First of all press the button Discover. Normaly the choice InventoryServices.svc should be shown into the frame Services.
Named the Namespace as InventoryServices and finally press OK button.
The service reference should have been appeared onto Solution Explorer.

Few rows below find the MainPage.xaml file. Press double click on it.
Normally you will look a screen like the left screenshot

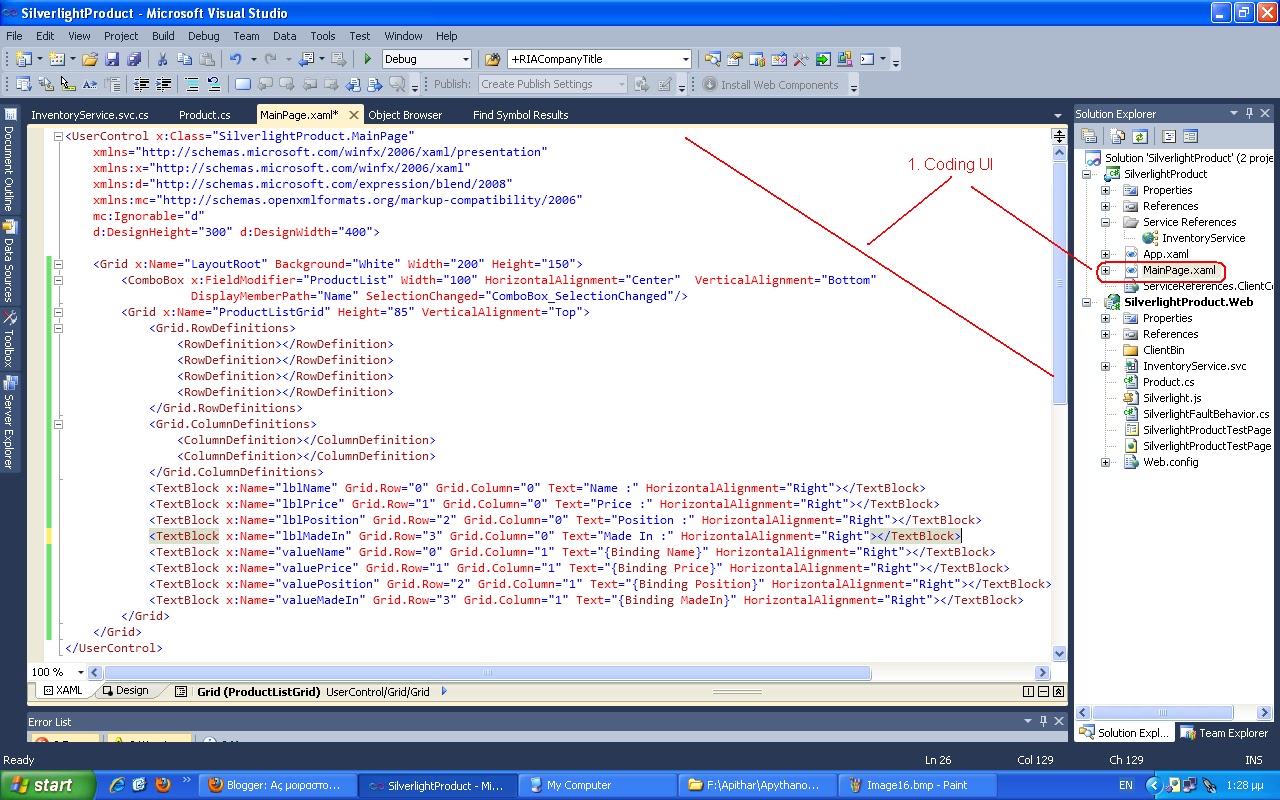
Type the code lines you will find on the left screenshot.
With those lines you will design the UI
With few words, you will place a compobox and some textblocks.

After you have finished with the UI, from the Solution Explorer press double clck onto MainPage.xaml.cs and type the code lines you will find into the screenshot at the right

You are ready to run your application
Press the Run Button from the main Toolbar

Into your default browser you will see something like the screenshot on the right.
Of course it is not the most beautiful thing you can see but if you wish you can try to improve the UI feeling.
Δεν υπάρχουν σχόλια:
Δημοσίευση σχολίου